General
Forget Technical Debt — Here’s How To Build Technical Wealth
Great article published in People & Culture Magazine, found this article on Flipboard August 11, 2016. Forget Technical Debt — Here’s How To Build Technical Wealth
How does one approach legacy code? Andrea Goulet and business partner Scott Ford love legacy code. Andrea and her team believe people are more than just makers, they are menders too!
Here’s 3 paragraphs from the article I think describe most of the development efforts I’ve been involved in over the years.
Sure, it might not make sense to test compulsively when you’re pushing toward a prototype. But once you have a product and users, you need to start investing in maintenance and incremental improvements. “Too many people say, ‘Don’t worry about the maintenance, the cool things are the features!’” says Goulet. “If you do this, you’re guaranteed to hit a point where you cannot scale. You cannot compete.”
As it turns out, the second law of thermodynamics applies to code too: You’ll always be hurtling toward entropy. You need to constantly battle the chaos of technical debt. And legacy code is simply one type of debt you’ll accrue over time.
“Again the house metaphor applies. You have to keep putting away dishes, vacuuming, taking out the trash,” she says. “if you don’t, it’s going to get harder, until eventually you have to call in the HazMat team.”
I see this a lot. Start on a new system and the initial focus is to get it working and usable and no one is really concerned with the structure of the system or how the code looks as long as it works. Once the initial system is working, work on fixing bugs and implementing enhancements. The end result is, we never go back to refactor the code base, especially the parts that could be promoted into base classes and generalized to help move towards following the basic principals defined in the SOLID acronym.
It’s an easy trap to fall into because management is focused on moving forward with new development and as long as the system works, why go back and take time to improve the code base that no one sees but the developers.
Whenever we started a new application, I had one director who would always say, “every project has a start and a finish”. Once it’s finished the application goes into maintenance mode not to be touched again unless absolutely necessary. Once an application was delivered to production we spent the next several months fixing bugs, after that the system wasn’t looked at again.
One of the short comings of that thought process was the lack of understaning how everything worked or fit together. There wasn’t time to create technical wealth. The director couldn’t understand how working on one application could benefit all applications in the system. They were missing the point about software development and not looking at the big picture, which makes is worth quoting the following statement from the article.
I know it’s hard to go back and refactor code once because it seems like you’re spending too much time on one area of code. If the system is around long enough there are parts that will need to be revisited several times to keep it going and making it better so you won’t need to rewrite it from scratch in five or six years.
It’s like a house, when the foundation and the frame are solid and flexible, it has a better chance to survive anything bad happening around it.
The Quiet Crisis unfolding in Software Development
Great post by Bill Jordan on May 27, 2016. He made a lot of good points about software developers and the state of software development.
Determine .NET Framework Version Installed
Image Posted on Updated on
Microsoft link for full description.
Microsoft MSDN Link
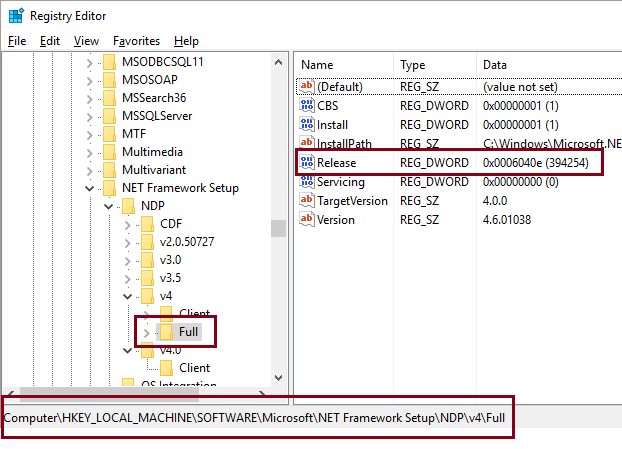
1. Open regedit
2. Navigate to folder: HKEY_LOCAL_MACHINE\SOFTWARE\Microsoft\NET Framework Setup\NDP\v4\Full
| Version | DWORD Value | |
| 4.5 | 378389 | |
| 4.5.1 | 378675 | Win 8.1 or Win Server 2012 |
| 4.5.1 | 378758 | Vista SP2, Win 7 SP1, Win 8 |
| 4.5.2 | 379893 | |
| 4.6 | 393295 | Win 10 |
| 4.6 | 393297 | All other OS versions |
| 4.6.1 | 394254 | Win 10 Nov Update |
| 4.6.1 | 394271 | All other OS versions |
| 4.6.2 | 394747 | Win 10 Preview Build 14295 |
| 4.6.2 | 394748 | All other OS versions |
Building Visual Studio 2015 Setup Projects From Command Line
I recently got the following error when I using the command line to build a Visual Studio 2015 solution that contained a setup project.
ERROR: An error occurred while validating. HRESULT=’8000000A’
In the registry find the key: HKEY_CURRENT_USER\SOFTWARE\Microsoft\VisualStudio\14.0_Config\MSBuild
If the entry EnableOutOfProcBuild is not in the right pane, then in right pane right click mouse, select New -> DWORD (32-bit) Value and enter EnableOutOfProcBuild and set data value to 0.
For a full explanation go to this link: http://colinsalmcorner.com/post/building-vs-2015-setup-projects-in-team-build
On our local build box I added the entry into the path under HKEY_LOCAL_MACHINE and a couple of entries in the HKEY_USERS before the build worked without any errors.
Sharing Session State between Classic ASP and .NET
- Required to access the Classic ASP session state variable.
- Required to share session state between multiple web applications.
Step #1:
The following code is in a page called AspSession.asp in the classic asp application.
<%
'------------------------------------------------------------------------------
if Session.Contents.Count = 0 then
    response.Write "Session.Contents.Count = 0"
    response.End
end if

'------------------------------------------------------------------------------
Dim values,remoteAddr,localAddr

remoteAddr = Request.ServerVariables("REMOTE_ADDR")
localAddr = Request.ServerVariables("LOCAL_ADDR")

'------------------------------------------------------------------------------
if remoteAddr = localAddr then
    strMode = Request.QueryString( "mode" )
    strName = Request.QueryString( "name" )

    if strMode = "get" then
        response.Write GetSessionVar( strName )
    elseif strMode = "getall" then
        response.Write GetAllSessionVars()
    elseif strMode = "set" then
        strValue = Request.QueryString( "value" )
        Session( strName ) = strValue
    end if
end if

'------------------------------------------------------------------------------
function GetAllSessionVars()
    dim sessionVars

    sessionVars = ""
    for each key in Session.Contents
        sessionVars = sessionVars & "{" & GetSessionVar( key ) & "}"
    next

    GetAllSessionVars = sessionVars
end function

'------------------------------------------------------------------------------
' returns a single session variable
function GetSessionVar( byval name )

    If IsArray(Session.Contents(name)) Then
        GetSessionVar = GetArrayVar
    ElseIf IsObject( Session.Contents(name) ) Then
        GetSessionVar = GetObjectDictionaryVar( name )
    Else
        GetSessionVar = name & "|" & Session.Contents(name)
    End If

end function

'------------------------------------------------------------------------------
' assumes this is an object/dictionary session variable.
function GetObjectDictionaryVar( byval name )
    dim values

    values = name & "[Object/Dictionary]"
    for each key in Session.Contents(name)
        values = values & key & ":" & Session.Contents(name)(key) & "|"
    next

    GetObjectDictionaryVar = values
end function

'------------------------------------------------------------------------------
' assumes this is an array session variable.
function GetArrayVar( byval name )
    dim values

    values = name & "[Array]"
    for each key in Session.Contents(name)
        values = values & key & ":" & Session.Contents(name)(key) & "|"
    next

    GetArrayVar = values
end function
%>
Step #2:
In the ASP.NET MVC web application, create a class SessionStateManager.cs. This is a generic class using .NET Session State Management. We are developing a system that uses multiple ASP.NET MVC web applications and this class is used by all of the applications and placed into a separate class library.
The appName in the URL is the path where the AspSession.asp file is located.
// Contains properties, etc for session state management. This class needs to be
// serializable so it can be saved in session state.
[Serializable]
public class SessionStateManager
{
    //-------------------------------------------------------------------------
    // This calls a web page in the classic asp application to get it's
    // current session variables.
    public static object Get( string name )
    {
        HttpContext context = HttpContext.Current;
        if ( context == null )
            return string.Empty;

        string value = null;
        foreach ( string key in context.Request.Cookies.AllKeys )
        {
            HttpCookie cookie = context.Request.Cookies[key];
            if ( cookie != null )
            {
                if ( cookie.Name.StartsWith( "ASPSESSION" ) )
                {
                    System.Uri uri = context.Request.Url;
                    string url = string.Format( "{0}://{1}/appName/aspSession.asp?mode=get&name={2}",
                                                 uri.Scheme, uri.Host, name );
                    HttpWebRequest request = (HttpWebRequest)WebRequest.Create( url );
                    request.Headers.Add( "Cookie: " + cookie.Name + "=" + cookie.Value );
                    HttpWebResponse response = (HttpWebResponse)request.GetResponse();
                    Stream responseStream = response.GetResponseStream();
                    if ( responseStream != null )
                    {
                        System.Text.Encoding encode = System.Text.Encoding.GetEncoding( "utf-8" );
                        StreamReader readStream = new StreamReader( responseStream, encode );
                        value = readStream.ReadToEnd();
                        response.Close();
                        readStream.Close();

                        // if true then it is either the wrong cookie or an expired cookie
                        // and will eventually be removed by the system.
                        if ( value.Equals( "Session.Contents.Count = 0" ) )
                        {
                            value = null;
                            continue;
                        }

                        string[] item;
                        if ( value.StartsWith( name + "[Object/Dictionary]" ) )
                        {
                            value = value.Replace( name + "[Object/Dictionary]", "" );
                            Dictionary<string,string> dictionary = new Dictionary<string, string>();
                            string[] dictionaryItems = value.Split( '|' );
                            foreach ( string s in dictionaryItems )
                            {
                                item = s.Split( ':' );
                                if ( item.Length == 2 )
                                    dictionary.Add( item[0], item[1] );
                            }
                            return dictionary;
                        }

                        item = value.Split( '|' );
                        if ( item.Length == 2)
                            value = (item.Length == 2) ? item[1] : string.Empty;
                    }
                }
            }
        }
        return value;
    }

    //-------------------------------------------------------------------------
    //  Disclaimer: This method hasn't been tested.
    //  Use this to set a session variable in the classic asp application.
    public static void Set( string name, object value )
    {
        HttpContext context = HttpContext.Current;
        String[] cookies = context.Request.Cookies.AllKeys;

        foreach ( string key in context.Request.Cookies.AllKeys )
        {
            HttpCookie cookie = context.Request.Cookies[key];
            if ( cookie != null && cookie.Name.StartsWith( "ASPSESSION" ) )
            {
                System.Uri uri = context.Request.Url;
                string url = string.Format( "{0}://{1}/appName/aspSession.asp?mode=set&name={2}&value={3}",
                                            uri.Scheme, uri.Host,
                                            context.Server.UrlEncode( name ),
                                            context.Server.UrlEncode( value.ToString() ) );
                HttpWebRequest request = (HttpWebRequest)WebRequest.Create( url );
                request.Headers.Add( "Cookie: " + cookie.Name + "=" + cookie.Value );
                HttpWebResponse response = (HttpWebResponse)request.GetResponse();
                Stream responseStream = response.GetResponseStream();
                break;
            }
        }
    }
}
Importing SSL Certificates
- Exporting SSL Certificate from Localhost
- Open IIS
- Click on Machine Name in Connections pane (left side)
- Double click the “Server Certificates” in middle pane
- To export as .cer
- Select or double click Certificate to export
- Click on the “Details” tab
- Click on the “Copy to File…” button
- Click Next > Next > Next
- Set Filename and location and Click on Next
- Click on Finish button
- To export as .pfx
- Right click on Certificate to export
- Select “Export…”
- Select file location to save certificate to, it will save as *.pfx file.
- Enter password twice, Click OK button to save
- Import SSL Certificate
- Run MMC.exe (click on Windows icon in lower left corner and enter mmc)
- Click on File > Add/Remove Snap-in…
- In the “Add or Remove Snap-ins” dialog box, select “Certificates” in the left side (Available snap-ins:)
- Click “Add >” button
- Select “Computer account”
- Select “Local computer: (the computer this console is running on)”
- Click on the “Finish” button
- Click “OK” button
- In left pane, click on: Certificates > Trusted Root Certification Authorities > Certificates
- In the right pane, click on “More Actions > All Tasks > Import…”
- Click “Next >” button
- Browse to the location where you exported or saved your certificate and select it.
- Click “Next >” button
- Select “Place all certificates in the following store”
– Select the “Trusted Root Certification Authorities” (click “Browse…” button and select if necessary.) - Click “Next >” button
- Click “Finish” button
- Import SSL Certificate into Chrome
- Open Chrome
- Select Chrome Settings > Show advanced settings > HTTPS/SSL > Manage Certificates
- Click on “Trusted Root Certification Authorities” tab and scroll down to find the certificate. If the certificate is not visible, it needs to be imported. Click on the “Import” button and follow the instructions above for importing an SSL certificate.
- Select your certificate
- Click on Advanced and select all check boxes
- Click OK
- The Chrome browser may need to be restarted.
—————— Update ———————
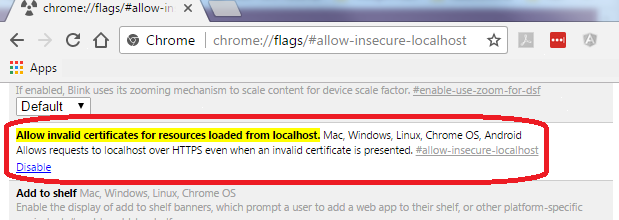
Just found out there is now a flag for this at URL:
chrome://flags/#allow-insecure-localhost

- ← Previous
- 1
- 2
- 3
- Next →
